





Tips Index
Have you ever had those friends replying to you with Spongebob GIFs and you replied too with another one? Or had those funny moments when people comment through GIFs and some responses are spectacular? People nowadays are having so much fun in using GIFs in expressing thoughts and opinions, especially through social media GIFs.
We commonly encounter GIFs in the comment sections or in private messengers. GIFs add so much story and fun to conversations that without it threads can be a little bland and boring. Even a single GIF can make you laugh, sad, or excited.
What is GIF?
GIF or short for “Graphic Interchange Format” is a lossless format for image files that supports both animated and static images.
These are like short video clippings that have been compressed for quick frames. So how can to make a GIF? GIF can be generated in GIF recorder or GIF screen capture.
VideoPower GREEN, a powerful Screen Recorder that could generate fun GIFs in a snap ready for sharing with your friends and family, be updated with the social media world, get hippy, young and vibrant with this new format.
Part 1: Record Screen
Step 1: Choose a sound source
If audio is needed in recording, choose the desired sound source among “System sound, Microphone or System sound and microphone” on the “Audio Input” menu. If audio isn’t needed, just choose “None”.

Step 2: Choose a recording area
Click on the “Record” button to choose the recording mode among “Full screen, Region, Audio, Web camera, and Around mouse” and then select the area you are going to record.

Step 3: Record screen activities
A pop-up window will show to confirm whether to start the recording or not. Click “OK” to start the recording.

While recording, adding annotations like lines, arrows, shapes, texts, highlight, blur, etc. is possible. Just click the edit button to show the editing toolbox.
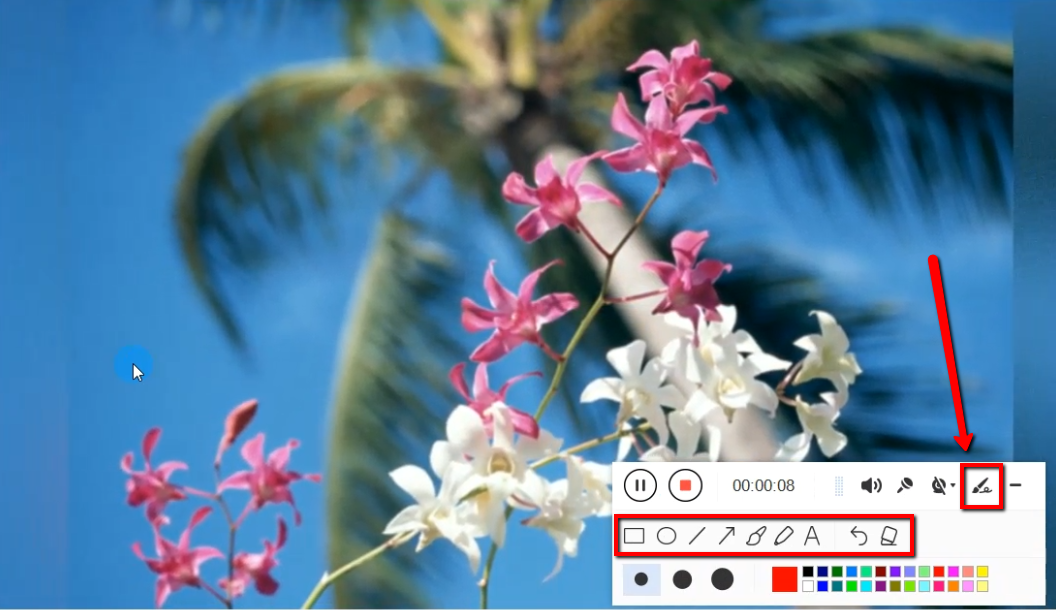
Step 4: End the recording
Click the “Stop” button to stop recording.

After recording, the screen will automatically redirect to the recorded file list on the main interface window.

Part 2: Edit and Convert to GIF
Step 1: Edit the Recorded File
After recording, the screen will automatically redirect to the recorded file list on the main interface window. Right-click the file and click “Edit” to be directed on the Video Editor.

Step 2: Edit Process
A video editor will open another window. Click the “Edit” button on the right side of the recorded video file to start editing.

For example, you can trim your video as shown below:
1) Click “Add Trim Marker” to add a trim marker to the progress bar, you can also add multiple trim markers by clicking this button multiple times.
2) Drag the slider to select the part you want to hold.
3) You can click the up or down button to set the start and end time as well.
4) Now you can choose to keep or delete the selected section.

Step 3: Save as GIF video
3.1 Convert your video to GIF
1) Click on “Profile”
2) Choose “Video”
3) Scroll down and click “GIF”
4) Choose any desired quality output for you GIF

3.2 Convert and Save
When the edits are done, click the “Convert” button. The software will start to convert and save the edited video in GIF format.

A pop-up window from the program will appear informing you that the conversion is complete.
Click “OK” to open the folder of your saved converted files.

Conclusion:
No more wondering how to make GIF, tell your friends about this, improve conversations by using a GIF maker like VideoPower GREEN.
This app also converts another video format from MP4 to VOB and even audio formats like MP3 to FLAC. This versatile software is all you need for your entertainment and project purposes.


